
iFACE
Interactive Face Animation - Comprehensive
Environment
Version 1.99
Interactive Media Technologies Inc. (iMediaTek)
iFACE
Framework
Installation
Application Development
Using iFaceStudio
Configuration Files
Architecture Description
Geometry Hierarchy
iFACE Parameters
iFaceStudio User's Guide
iFACE Framework and iFaceStudio Application
Installation
Create the folder
C:\iFACE, unzip the installation file in atemporary directory, and copy
the unzipped content to C:\iFACE. Make sure that C:\iFACE includes files
such as iFaceStudio.exe. Using another location is possible but may
need modification of the provided data files.
Run TestDotNet.exe (shows a dialog
box titled Test .NET) and TestD3D.exe (shows a 3D teapot) to
test if .NET framework and Managed DirectX are installed in your system. If
they are not, or you receive a runtime error and can not run iFaceStudio.exe,
try installing .NET framework and Managed DirectX v9.0c.
You can download installation files for .NET and DirectX
from Microsoft or
iFACE web sites.
Before running iFaceStudio, register the files ETCodeX.dll
and SpeeX.dll using this command:
regsvr32 <DLL-filename>
or run RegisterDLLs.bat.
Application Development
To develop new applications with iFACE framework, you can:
Add Wrappers.dll to a C# project References,
Add Face3DControl to the Toolbox (Tools/Customize Toolbox/.NET), and insert an
instance of the control to a form. Or
Add Helpers.dll, Geometry.dll, Behaviour.dll, and Speech.dll
to the project References, and derive the form from Face3DForm.
The necessary iFace namespaces must be added to the source code:
using iFace.Geometry;
using iFace.Behaviour;
using FaceHelpers;
using D3DHelpers;
using GeneralHelpers;
using SoundHelpers;
Using iFaceStudio
iFaceStudio is authoring and testing app for iFACE. It includes two main 3D
(Mesh) and 2D (Imager) windows, and the Control panel with
following tabs:
iFACE , general iFACE functionality such as Animation and
Defining KeyFrames.
Geometry , components and features in geometry hierarchy and their
parameters.
MPEG-4 , access to MPEG-4 Face Definition
Parameters (FDPs) and Face Animation Parameters (FAPs)
.
Mesh Setup , load/save mesh objects and define their
regions.
Imager Setup , load/save image objects and define their regions.
View/Tools, set viewing properties of iFaceStudio and access general
tools
Animation types are:
FML, XML-based scripting language (see FML v2.0 Specification
)
KeyFrame, as defined by iFaceStudio
Wave, either a wave file (Playback mode) or real-time audio (Record mode)
Both Playback and Record mode can use local
wave files (to read from or write to) or a remote instance of iFaceStudio in
the opposite mode. To specify a remore operation following format is necesary
for file name:
mahine>port, where machine is IP address or
computer name separated from port number by >.
For Playback the file (or remote address) must be Opened first. For Record, the Audio Recording File button must be used to set the target.
Creating a KeyFrame file starts and end by Define button in Keyframe group. Each key frame is then added after proper head movements are done in MPEG-4 tab.
Typical behaviours are defined as Keyframe files. Each personality has an entry file with extension .ptype in Behaviours folder and a corresponding sub-folder including two groups of keyframe files for impulse and emphasis. The current personality is set by Personality button in iFACE tab.
See iFaceStudio User's Guide for details on commands.
Configuration Files
The iFACE framework is configured through the following file
types (specified with their extensions):
CHR (Character): Text file that contains the names
of geometry and personality files to create a character
MSH (Mesh): Binary file that is generated by iFaceStudio and
contains data for a HeadMesh object (this includes the name of Direct3D .X mesh
file)
IMG (Image): Binary file generated by iFaceStudio for
HeadImage object (when using 2D faces)
CMP (Component): Binary file for initializing the components
PTYPE (Personality Type): Text file that defines a personality
through parameters and typical behaviours stored in keyframe files
X (DirectX Mesh): Standard text file that contains
Direct3D mesh information. This file includes path to an image file that is
used for texture.
KYF (Keyframe): Binary files that define key frames for a
facial behaviour
DEF (Definition, optional): Binary or Text file for extra
head definitions and new texture applied to the base mesh
The files do not need to be in any specific folder, but by default they are all in one main directory except PTYPE files which are in Behaviours subdirectory. Default files provided at installation assume these addresses. It is possible to edit the text files for new addresses or run the program and set new addresses for files. It is always possible to use . meaning the current directory (of the file that has the address in it) to write relative file paths, as done in default DirectX mesh file (Face.x). The address of texture file in .X file is written as .\\Face.bmp meaning the same directory as .X.
CHR file has following format:
*msh (or img or def or cmp or ptype)
{file path}
The file path can be written using .\ meaning the same directory as .CHR file. Here (unlike the .X file) one \ is enough.
iFACE Architecture Description
The iFACE framework consists of following namespaces:
FaceHelpers , for all layers
iFace.Geometry , for Data layer (see geometry
hierarchy section )
iFace.Behavior , for Data layer
iFace.Stream , for Streaming layer
iFace.Wrap , for Wrapper layer
and Application-specific namespaces for Application layer
Each namespace provides classes for the related funcionality/layer in iFACE environment.
Helpers
Main classes are Face2DForm (derived from
ImageForm) and Face3DForm (from
D3DForm). They use HeadImage (from
AppImage) and HeadMesh (from
AppMesh) classes to encapsulate actual head data. D3DForm
(derived from GraphicsSample) uses AppMesh
to manage mesh data with regions. ImageForm (from
Form) uses AppImage for that purpose.
These two classes have nothing to do specifically with Face.
None of the form classes in Helpers namespace are to
be used directly. They do not have the actual graphic object or any other user
interface controls. As seen in sample applications (e.g. iFaceStudio
), form classes are tobe derived from them, with proper controls such as image
panel.
AppMesh (and HeadMesh) are
serialized into/from .msh files. AppImage (and
HeadImage) are serialized into/from .img files.
HeadMesh and HeadImage implement
and expose IHeadData interface. HeadData objects (HeadMesh
and HeadImage) include not only regions but also
FaceParams object.
FaceParams has members for FDP and
FAP. FDPs define the topology (feature pointa) and are serialized (i.e.
saved). FAPs are used in runtime for animation, and are not
serialized. FAPs in group-1 (viseme and expression) are combination of
other FAPs. This combination is serialized.
Geometry
The Geometry module controls the HeadData objects by
accessing IHeadData interface (independent of 2D or
3D). Geometry itself is accessed using IGeometry,
IHead and other interfaces. Head
object is the main object in Geometry that implements and exposes these
interfaces. Other objects are created for lower-level functionality, with their
own interfaces, e.g. IMouth.
Head object also implements and exposes IAnimation for animation control. It creates default speech controller object that implements and exposes the ISpeech interface. Speech module is part of Gemetry namespace but is implemented as a separate DLL to allow defining other speech controllers. Default speech controller uses ETCodeX ActiveX , a non-managed code. Application can create Geometry/Head object with default animation and speech controllers or create new objects that implement IAnimation or ISpeech and pass them to Head.
Behavior
The Behavior module includes three components each with its own
interface: Knowledge, Personality
and Mood. By default they are all implemented in one
object called Actor, but external objects can be
implemented to support and expose the same interfaces.
IKnowledge interface controls the main actions
performed during the animation. It is responsible for processing the input
scripts such as Face Modeling Language documents
and sending proper commands to Geometry or other Behavior components. IPersonality
and IMood interfaces are related to long-term and
short-term behavioral patterns.
The actual head data is stored in an object called HeadData tht includes Points
(vertex or pixel) and Regions (i.e. small groups of points that usually move
together). Regions usually do not overlap but they can depending on design.
Geometry object is a hierarchy of abstraction layers on top of HeadData.
These layers are:
Head, i.e. whole head
Components, including functional groups i.e. Eyes, Ears,
Brows, Nose, Mouth, and Base (the rest of the head)
Features, i.e. detail lines around main parts of Components
FeaturePoints, MPEG-4 FDPs
PhysicalPoints, actual HeadData points (Vertex or Pixel)
Each one of the objects in these layers have Regions of Influence (ROI), i.e. HeadData Regions affected by the object. In case of Components and Features, this is a group of HeadData Regions. Different Components can share some of their ROIs. For each FeaturePoint there is only one ROI, i.e. each FeaturePoint is associated with one HeadData Region. Components break a requested action into proper movements of FeaturePoints or move their ROIs directly. FeaturePoints move the points on their ROI proportional to the inverse of distance.
Head actions (moving and resizing) are defined for Components or Features which
in turn affect the related FeaturePoints and their Regions. All action requests
(params) are primarily sent to Head. Application can ask Head to create and use
lower level objects if necessary, e.g. use a Component for actions with wide
area of influence or send the action request directly to FeaturePoint.
iFACE is a parameterized system. iFACE parameters have up to three numeric and
one text data, plus following attributes:
Type
Group
Param Number
SubParam
iFACE parameter types can be:
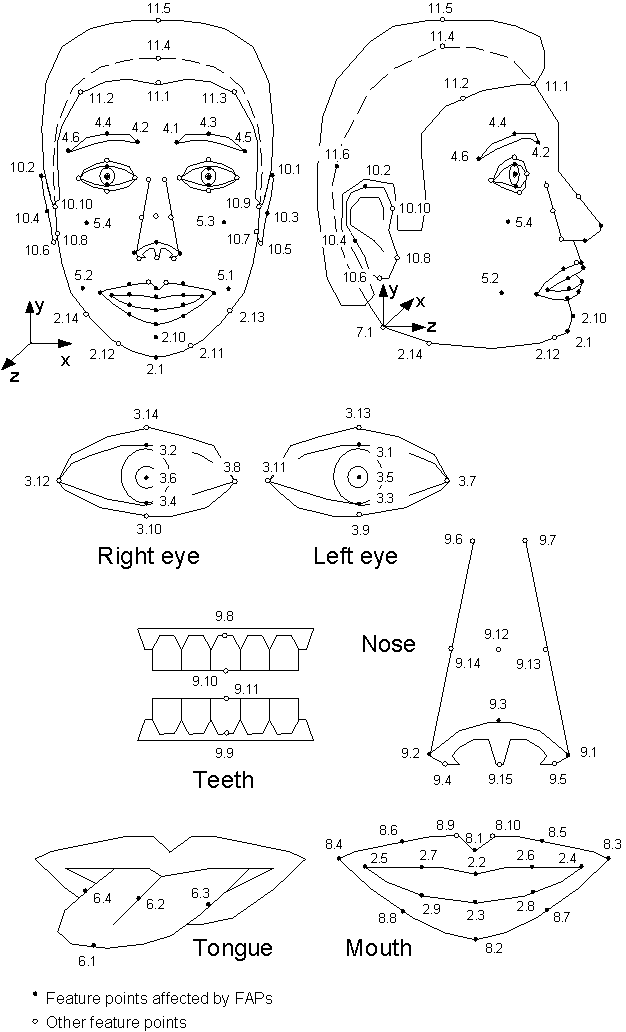
FDP: MPEG-4 FDPs
are from Group 2 to 10. Param Numbers are feature point numbers.
SubParams control the direction:
1 - X
2 - Y
3 - Z
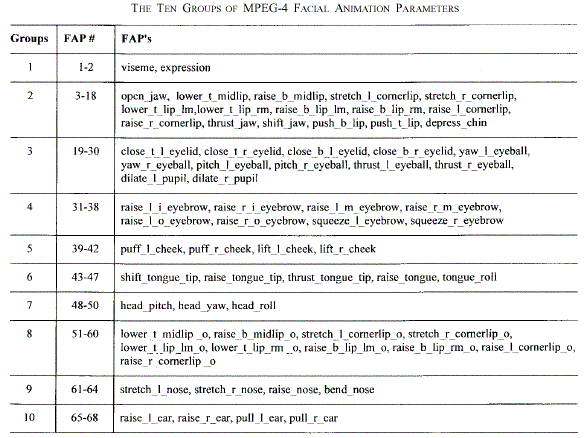
FAP:
MPEG-4 FAPs are from Group 1 to 10. Param Numbers are index within
Group. Group 1 FAPs have two possible Param Number: 1 for Visems and 2 for
Expressions, and use SubParam.
Component: Head Component Parameters
are grouped as follows:
1 - Whole Head
2- Left Brow
3 - Right Brow
4 - Left Eye
5 - Right Eye
6 - Nose
7 - Mouth
8 - Left Ear
9 - Right Ear
10- Neck
Param Numbers 1 and 2 are Move and Scale. 3 to 5 are different for each
Group. SubParams control the direction:
1 - X
2 - Y
3 - Z
rFace: Legacy
rFace Parameters.
Extra: Other Parameters:
Group-1 (no subparam)
1 - Texture (filename is the
text value, material is subparam)
2 - Open/Play (filename text value, value1 if nonzero
is fps for play-to-file)
3 - Record (no value)
4 - Reset Geometry (no value, subparam 1 reset all, subparam
2 reset mood)
5- Ambient Color (RGBA text value)
6- Background Color (RGBA text value)
7- Open personality type (filename text value)
8- Open geometry (filename text value, .msh or .x for
3D, .img or .bmp or .jpg for 2D)
9- RecordFile (filename text value)
10- Background audio (filename text value)
11- MakeMovie (filename text value)
Group-2
1- Camera ViewFrom Point (subparams 1-3 for xyz)
2- Camera LookAt Point (subparams 1-3 for xyz)
Group-3
1- Light Source X-Direction (subparam is source index)
2- Light Source Y-Direction (subparam is source
index)
3- Light Source X-Direction (subparam is source
index)
4- Light Source Red Color (subparam is source index)
5- Light Source Green Color (subparam is
source index)
6- Light Source Blue Color (subparam is source
index)
iFACE parameters can work in absolute and relative (delta) value modes. When creating a Keyframe file, all the parameters are assumed to have the same mode. When creating a delta KYF file, the design is done with normal (absolute) parameters (i.e. absolute values are used for all KYF params) but the Delta option is selected for params. This makes iFACE animation engine to convert the param values to delta before playing the KYF. This way more than one KYF can be safely animated together.
iFaceStudio
User's Guide
iFaceStudio
has three main windows:
Face3D
FaceImager
FaceControls
FaceControls
has the detail UI objects to control the application. Face3D shows 3D head and
FaceImager shows the texture. Application starts by locating a .CHR file as the
main database. CHR files include address of other data files required for
operation. Advanced Options in View/Tool tab of Face Controls allow selecting a
different CHR file.
1-
FACE-3D
This
window shows the 3D results and allow moving the head around to see the other
sides. X axis is horzontal (positive right), Y axis (positive up) is vertocal,
and Z axis is in right angle to image plane (positive in). Defining regions,
and selection of FDPs are also done in this window. Face3D has following local
controls on top:
**Distance,
to change the the Z coordinate of camera with a negative value.
**Vertex
Select checkbox to go to vertex selection mode (you can select vertices and see
their info)
**Wireframe
checkbox to switch between full-render and wireframe modes
**Controls
and Imager checkboxes to show/hide these windows
**Select
Vertex button to select a vertex by entering its index
**Edit
Vertices button to edit the vertices in a selected region
Selecting
vertices (for viewing only or for editing regions) can be done in SelectVertex
mode (checkbox) by SelectVertex button or by left-clicking. Left-click
intersects the vector with the head and locates the poly. On that the closest
vertex is selected. Top of the window shows the index of selected vertex.
Righ-clicking will deselct the vertex. Some vertices share the same location
but different polygons. Clicking on different polygons will select different
vertices, in such cases.
2-
FACE-IMAGER
This
window shows the texture. The local controls are for zooming, enabling Pan mode
(move the image by mouse-dragging) and showing Regions.
3-
FACE-CONTROLS
This
is the main window for controlling the iFaceStudio Application. It has
following tabs:
3-1-
iFACE
General
controls can be found here.
Personality
**Set
selects active personality by selecting a .ptype file (usually located in
Behaviours subdirectory)
**An
edit box shows the current personality
KeyFrame
There
are two buttons in this group, each with two possible labels: Define/End and
OneShot/AddFrame.
**Define
starts/ends definition of KeyFrame file. Its label changes to End after this.
The user changes the parameters to get the desired key frame and then uses the
other button to add this frame to file. When done with frames, clicking on this
button end the file by selecting a name.
**One-Shot
creates a keyframe file containing only one frame based on current parameter
setting
Animation
**Filename
desplay currently selected file
**Open
button opens a new file (or currently selected file) to play
**Play
starts playback
**Stop
ends the playback
**Record
starts recording audio
**CaptureFile
selects a file that audio is recorded to or animation is saved to if Save is
selected
**Capture
checkbox determines if data is saved to file
**Audio selects a background audio for the animation (must be selcted before
opening the anim file)
To save the video frames to file, open the
animations file, select a capture file (new BMP or JPG file), select Capture
checkbox, change the frame rate if necessary, and start the playback.
The frames will be saved by adding a 5-digit number to the file name you
specifed.
Use MovieMaker.exe program (accessible in
View/Tools tab) to create a video file from images and add optional audio. The
program is a console application priovided with iFACE executables.
General
**Exit
terminates the program
**FML
Command Line brings up a window to enter FML commands. For example following
command is used to apply an rFace parm 2 with value of 1 (limited support)
rfp
type="2" value="1"
3-2-
Geometry
This
tab gives access to component-level parameters
Components
**Select
determines the currently selected component from list
**New
initializes the component settings
**Load
opens a new component file
**Save
and SaveAs store the changes to component file
**View/Edit
Features Line give access to selected feture line of the selected component
Component
Parameters
**Param
**SubParam
**Value
**Add defines a new component parameter using a KYF file
**Remove deletes an existing parameter
Definition
**Base
resets the geometry to original .x file
**Load
selects a definition file that modifies the base geometry
**Save
and SaveAs store the changes to definition
*def
.\face.def
3-3-
MPEG-4
This
tab is for MPEG-4 FDPs and FAPs
. Each parameter has group, param, and subparam values. For example the
expression Joy is a FAP in group 1 with param value of 2 (expressions) and
subparam value of 1.
Select
To
select a parameter and select regions if the param is an FDP.
Locate
**SetFAPs/FromMesh
(the label depends on the type of param) sets the lower level FAPs based on
current settings for a group-1 FAP or locate the vertex for an FDP (select the
FDP, select the vertex, and then click on this)
**Load
sets the param settings for current selection from file
**Save
stores the param settings to file
The
dynamic value of FAPs are not saved.
Group-1
FAPs are defined as a combination of others. To define a group-1 FAP (viseme or
expression), set all other FAPs to achive desired look, then select the group-1
FAP and click on Set FAPs. You can simplify this by seting as many facial
states using FAPs, saving them with Snapshot command in iFACE tab, bringing
them up by Open/Play commands in iFACE tab, comparing them and clicking on Set
FAPs for any one that looks better.
Move/Resize
Controls
the value of params and can reset them all to initial values.
3-4-
3D Setup
This
tab is for 3D settings. This includes the base mesh (.x file) and the regions.
The info is saved in a .msh file.
Mesh
**New
creates a new .msh file
**Load
opens an existing .msh file
**Save
and SaveAs store the .msh file
**Load
Texture uses a new texture
**Save.X
stores the current setting into .x file (no regions)
**SaveSnapshot
captures the 3D screen and saves to a bitmap file.
Regions
**Combo
box selects the region
**Define
starts definitionof a new region
**Delete
removes currently selected region
**Edit
modifies the currently selected region
**View
shows the currently selected region
**ReadFromBitmap
reads an image based on texture file with regions specified by color and
determines the regions based on that
**Export
saves the regions in an ASCII file
**Import
reads regions from an ASCII file
3-5-
Imager Setup
This
tab is for 2D settings. This includes the base image and the regions. The info
is saved in a .img file.
Image
**New
creates a new .img file
**Load
opens an existing .img file
**Save
and SaveAs store the .img file
**Reload
Bitmap resets the image
**SaveBitmap
stores the current bitmap
**Symmetric
copies selected region or all of them to the symmetrically located region. If
we have a half-texture, we define, for instance, right-ear and copy it to
left-ear
Regions
**Combo
box selects the region
**Define
starts definitionof a new region
**Delete
removes currently selected region
**Edit
modifies the currently selected region
**View
shows the currently selected region
**SelectedRegionsTo3D
exports selected region to 3D
**Export
saves the regions in an ASCII file
**Import
reads regions from an ASCII file
3-6-
View/Tools
These
are some general controls for viewing and special tools. Some important ones
are explained here.
Advanced
Options
**Select
CHR open a new character file
**Lights
control up to 6 directional light source